Java and Scala overview
Pants's support for Java and Scala.
We are done implementing most functionality for Pants's Java and Scala support (tracked here). However, there may be use cases that we aren't yet handling.
Please share feedback for what you need to use Pants with your JVM project by either opening a GitHub issue or joining our Slack!
Check out github.com/pantsbuild/example-jvm to try out Pants's Java and Scala support.
Initial setup
First, activate the relevant backends in pants.toml:
[GLOBAL]
backend_packages = [
  # Each backend can be used independently, so there is no need to enable Scala if you
  # have a pure-Java repository (or vice versa).
  "pants.backend.experimental.java",
  "pants.backend.experimental.scala",
]
Then run pants tailor :: to generate BUILD files. This will create java_sources and scala_sources targets in every directory containing library code, as well as test targets like scalatest_tests and junit_tests for filenames that look like tests.
❯ pants tailor ::
Created src/jvm/org/pantsbuild/example/app/BUILD:
  - Add scala_sources target app
Created src/jvm/org/pantsbuild/example/lib/BUILD:
  - Add java_sources target lib
Created tests/jvm/org/pantsbuild/example/lib/BUILD:
  - Add scalatest_tests target lib
You can run pants list :: to see all targets in your project:
❯ pants list
...
src/jvm/org/pantsbuild/example/app:app
src/jvm/org/pantsbuild/example/app/ExampleApp.scala
src/jvm/org/pantsbuild/example/lib:lib
src/jvm/org/pantsbuild/example/lib/ExampleLib.java
tests/jvm/org/pantsbuild/example/lib:lib
tests/jvm/org/pantsbuild/example/lib/ExampleLibSpec.scala
Choosing JDK and Scala versions
Pants 2.11.x adds support for choosing JDK and Scala versions per target in your repository, but to reduce the amount of boilerplate required, most users set repository-wide defaults in pants.toml, and then only override them when necessary for particular targets.
JDK
JDKs used by Pants are automatically fetched using Coursier, and are chosen using the [jvm].jdk setting to set a repository-wide default.
To override the default on a particular target, you can use the jdk= field. It can be useful to use the parametrize builtin with the jdk= field, particularly to run test targets under multiple JDKs.
Scala version
The Scala version to use is configured on a resolve-by-resolve basis (see the "Third-party dependencies" section below) using the [scala].version_for_resolve option. The default Scala version for your repository will thus be whichever Scala version is configured for the "default" resolve, which is configured by the [jvm].default_resolve option.
To use multiple Scala versions in a repository, you would define multiple resolves, and then adjust the resolve field of any targets which should be used with the non-default_resolve resolve.
To cross-build a set of Scala targets for multiple Scala versions, you can use the parametrize builtin with the resolve= field of the target and its dependencies.
The Scala backend currently requires that a jvm_artifact target for the org.scala-lang:scala-library Scala runtime be present in any resolve used for Scala. If such a jvm_artifact is missing, Pants will error. Pants will automatically inject a dependency on the runtime. (This target may be automatically supplied by Pants in a future version, but that is not currently implemented.)
First-party dependencies
In many cases, the dependencies of your first-party code are automatically inferred via dependency inference based on your import statements. If you do need to declare additional dependencies for any reason, you can do so using Pants' syntax for declaring dependencies for targets.
Third-party dependencies and lockfiles
Third-party dependencies (i.e. those from repositories like Maven central) are also automatically inferred via dependency inference, but must first be declared once per repository as jvm_artifact targets:
jvm_artifact(
    group="com.google.guava",
    artifact="guava",
    version="31.0.1-jre",
    # See the callout below for more information on the `packages` argument.
    packages=["com.google.common.**"],
)
If your third party dependency is a Scala library, you should use the scala_artifact target instead like follows:
scala_artifact(
    group="org.typelevel",
    artifact="cats-core",
    version="2.9.0",
    packages=["cats.**"],
)
Pants will use the right artifact for the Scala version corresponding for the resolve specified (or the default one).
Pants requires use of a lockfile for thirdparty dependencies. After adding or editing jvm_artifact targets, you will need to update affected lockfiles by running pants generate-lockfiles. The default lockfile is located at 3rdparty/jvm/default.lock, but it can be relocated (as well as additional resolves declared) via the [jvm].resolves option.
packages argumentTo efficiently determine which symbols are provided by thirdparty code (i.e., without hitting the network in order to compute dependencies in the common case), Pants relies on a static mapping of which artifacts provide which symbols, and defaults to treating each jvm_artifact as providing symbols within its group.
The packages argument allows you to override which symbols a jvm_artifact provides. See the jvm_artifact docs for more information.
resource targets
To have your code load files as "resources":
- Add a
resourceorresourcestarget with the relevant files in thesource/sourcesfield, respectively. - Ensure that an appropriate
source_rootis detected for theresourcestarget, in order to trim the relevant prefix from the filename to align with the layout of your JVM packages. - Add that target to the
dependenciesfield of the relevant JVM target (usually the one that uses the JVM APIs to load the resource).
For example:
- pants.toml
- src/jvm/org/pantsbuild/example/lib/BUILD
- src/jvm/org/pantsbuild/example/lib/Loader.java
- src/jvm/org/pantsbuild/example/lib/hello.txt
[source]
# In order for the resource to be loadable as `org/pantsbuild/example/lib/hello.txt`,
# the `/src/jvm/ prefix needs to be stripped.
root_patterns = ["/src/*"]
java_sources(dependencies=[":hello"])

resources(name="hello", sources=["hello.txt"])
package org.pantsbuild.example.lib;

import com.google.common.io.Resources;

public class Loader {
  public static String load() {
    ... = Resources.getResource(Loader.class, "hello.txt");
  }
}
Hello world!
Compile code
To manually check that sources compile, use pants check:
# Check a single file
❯ pants check src/jvm/org/pantsbuild/example/lib/ExampleLib.java

# Check files located recursively under a directory
❯ pants check src/jvm::

# Check the whole repository
❯ pants check ::
Run tests
To run tests, use pants test:
# Run a single test file
❯ pants test tests/jvm/org/pantsbuild/example/lib/ExampleLibSpec.scala

# Test all files in a directory
❯ pants test tests/jvm::

# Test the whole repository
❯ pants test ::
You can also pass through arguments to the test runner with --, e.g.:
# Pass `-z hello` to scalatest in order to test a single method
❯ pants test tests/jvm/org/pantsbuild/example/lib/ExampleLibSpec.scala -- -z hello
Timeouts
Pants can cancel tests which take too long. This is useful to prevent tests from hanging indefinitely.
To add a timeout, set the timeout field to an integer value of seconds in any of the supported targets, like this:
java_junit_test(name="java_test", source="Test.java", timeout=120)
scala_junit_test(name="scala_junit_test", source="Test.scala", timeout=100)
scalatest_test(name="scalatest_test", source="Spec.scala", timeout=80)
When you set timeout on any of the target generators (i.e. java_junit_tests, scalatest_tests, etc.), the same timeout will apply to every generated corresponding target.
java_junit_tests(
    name="tests",
    overrides={
        "MyClass1Test.java": {"timeout": 20},
        ("MyClass2Test.java", "MyClass3Test.java"): {"timeout": 35},
    },
)
You can also set a default value and a maximum value in pants.toml:
[test]
timeout_default = 60
timeout_maximum = 600
If a target sets its timeout higher than [test].timeout_maximum, Pants will use the value in [test].timeout_maximum.
Use the option pants test --no-timeouts to temporarily disable timeouts, e.g. when debugging.
Setting environment variables
Test runs are hermetic, meaning that they are stripped of the parent pants process's environment variables. This is important for reproducibility, and it also increases cache hits.
To add any arbitrary environment variable back to the process, you can either add the environment variable to the specific tests with the extra_env_vars field on junit_test / junit_tests / scala_junit_test / scala_junit_tests / scalatest_test / scalatest_tests targets or to all your tests with the [test].extra_env_vars option. Generally, prefer the field extra_env_vars field so that more of your tests are hermetic.
With both [test].extra_env_vars and the extra_env_vars field, you can either hardcode a value or leave off a value to "allowlist" it and read from the parent pants process's environment.
- pants.toml
- project/BUILD
[test]
extra_env_vars = ["VAR1", "VAR2=hardcoded_value"]
junit_tests(
    name="tests",
    # Adds to all generated `junit_test` targets,
    # i.e. each file in the `sources` field.
    extra_env_vars=["VAR3", "VAR4=hardcoded"],
    # Even better, use `overrides` to be more granular.
    overrides={
        "StrUtilTest.java": {"extra_env_vars": ["VAR"]},
        ("DirUtilTest.java", "OSUtilTest.java"): {"extra_env_vars": ["VAR5"]},
    },
)
Protobuf
There's support for ScalaPB and protoc Java generated code, currently in beta stage. To enable them, activate the relevant backends in pants.toml:
[GLOBAL]
backend_packages = [
    "pants.backend.experimental.codegen.protobuf.scala",
    "pants.backend.experimental.codegen.protobuf.java",
]
This adds the new protobuf_source target, which you can confirm by running pants help protobuf_source.
Lint and Format
scalafmt and Google Java Format can be enabled by adding the pants.backend.experimental.scala.lint.scalafmt and pants.backend.experimental.java.lint.google_java_format backends (respectively) to backend_packages in the [GLOBAL] section of pants.toml.
Once enabled, lint and fmt will check and automatically reformat your code:
# Format this directory and all subdirectories
❯ pants fmt src/jvm::

# Check that the whole project is formatted
❯ pants lint ::

# Format all changed files
❯ pants --changed-since=HEAD fmt
Working in an IDE
Pants supports loading Java and Scala projects in IntelliJ via the BSP protocol (which should ease VSCode support via Metals, although it is not yet supported).
Usage
After Setup (see below), and after IntelliJ has finished indexing your code, you should be able to:
- Use goto definition and other symbol-index-using operations.
- Run test classes, which will first compile them will Pants (and render compile failures if not), and then run them in the foreground with IntelliJ's test runner.
Setup
First time setup (per-repository)
- Use a version of Pants containing BSP support:
- Versions after
2.12.0a0support code indexing. - Versions after
2.13.0.dev2support test running.
- Versions after
- Add a
.gitignoreentry for the.bspdirectory:
- .gitignore
- ...
# This directory is not committed: each BSP user will create it independently.
/.bsp/
- Add a "group" config file like the one below, adjusting the address specs and resolve name as appropriate.
- bsp-groups.toml
- ...
# A "group" named `default`.
# Multiple groups are supported: consider creating a group per project or team.
[groups.default]
addresses = [
  "src/jvm::",
  "tests/jvm::",
]

resolve = "jvm:jvm-default"
- Add to
pants.tomlan option to point at the BSP configuration file:
- pants.toml
- ...
[experimental-bsp]
groups_config_files = ["bsp-groups.toml"]
Per-user setup
- Run pants experimental-bsp to write the BSP connection file and script.
- Ensure that you have the IntelliJ Scala plugin installed (it provides BSP support).
- In IntelliJ, choose
File > New > Project from Existing Sources… - Choose the root of the repository for the project from the file dialog.
- In the "Import Project" dialog, choose "Import project from external model" and select "BSP."
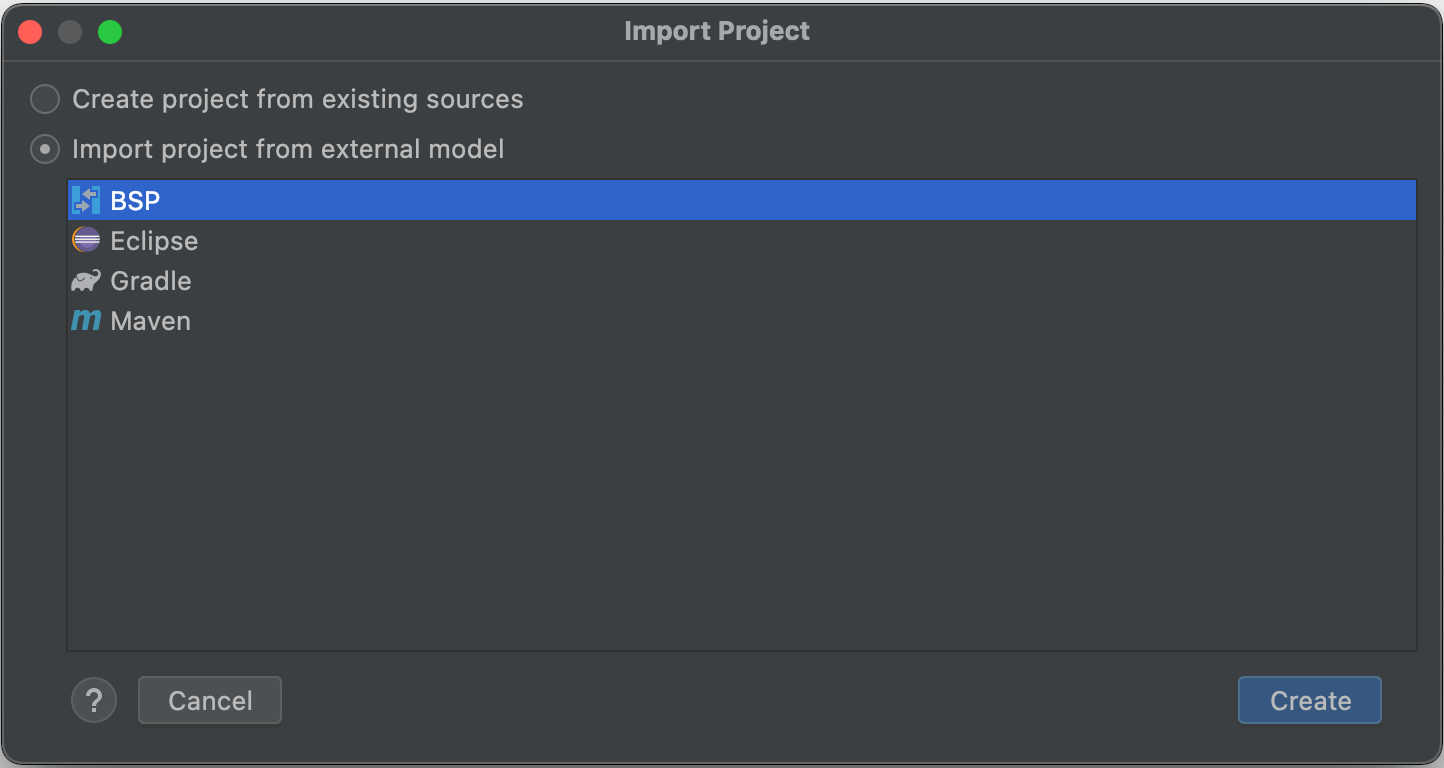
- Click "Create".
- IntelliJ will invoke Pants to run the BSP server and synchronize state to produce IntelliJ modules.
Troubleshooting
- If you see errors related to missing tools, you can set additional environment variables for BSP invocations in
pants.tomlunder the[experimental-bsp].runner_env_varsoption, and then re-runpants experimental-bsp.- This is necessary because IntelliJ is invoked on macOS generally by launchd and not from the shell. Any
PATHset in the shell will not be passed to the Pants BSP server in that case. - If this is developer-specific, consider setting
--experimental-bsp-runner-env-argsas a command-line option, or using a.pantsrcfile.
- This is necessary because IntelliJ is invoked on macOS generally by launchd and not from the shell. Any
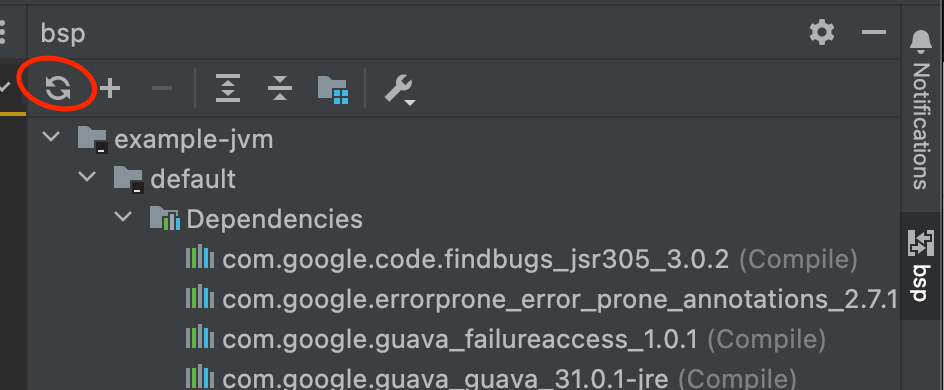
- After configuration changes, or after adding new thirdparty dependencies, you will generally need to reload the BSP configuration (for now), which you can do with this button in the side panel:
- When filing bug reports, include the log output of the Pants instance hosting the BSP server, which goes to
.pants.d/bsp/logs/stderr.log.